How to Animate a Spider-like Creature Without Getting Tangled in Eight Legs
My name is Anastasia Popova, I'm an Animation Artist at Plarium Kharkiv. You can see a showreel of my work here. In this article I want to share my experience of working on Skavag, a spider-like creature that is a boss in our game Raid: Shadow Legends. In this article I'll talk about working with a concept artist and looking for references, then dive into the specifics of animating creatures with complex anatomy. At the end of the article you will find useful tools and resources for animators who want to boost their professional development.
Creating terms of reference for animation: a symbiosis of ideas from a concept artist, a game designer, and an animator
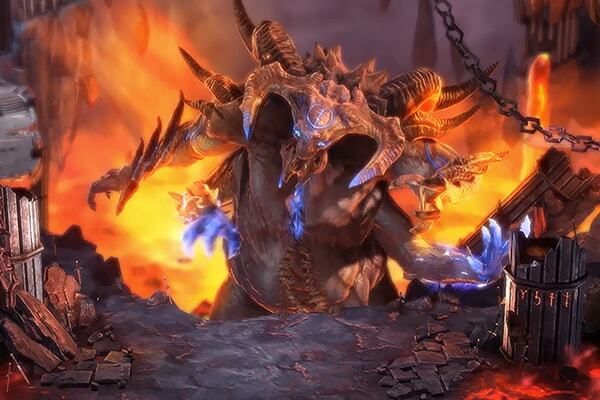
The creation of any game character begins with an idea proposed by a game designer which is then brought to life by a concept artist. Below you can see one of the first images one of our concept artists came up with that showed Skavag as a mix of a spider and a beetle.
 Concept by artist Olexandr Dudar
In any game, every character or creature you create has their own characteristics, which covers everything from a unique set of skills they might possess or a certain type of ammunition they use, through to how they behave in battle. Therefore, an animator can only start work after they receive a complete description of those characteristics, and a detailed breakdown of technical requirements from the game designer.
Description of in-game skills for our spider-like creature
In Raid, all our characters and creatures have skills, with Skavag no exception. Her skills, which as an animator, I needed to take account of, are listed below:
First skill: Attacks all enemies. Damage increases by 15% if the target has Poison debuff.
Second skill: Attacks all enemies. Has a 70% chance of decreasing the Turn Meter by 30%. If the target’s Turn Meter is fully depleted, places a Sleep debuff for 1 turn.
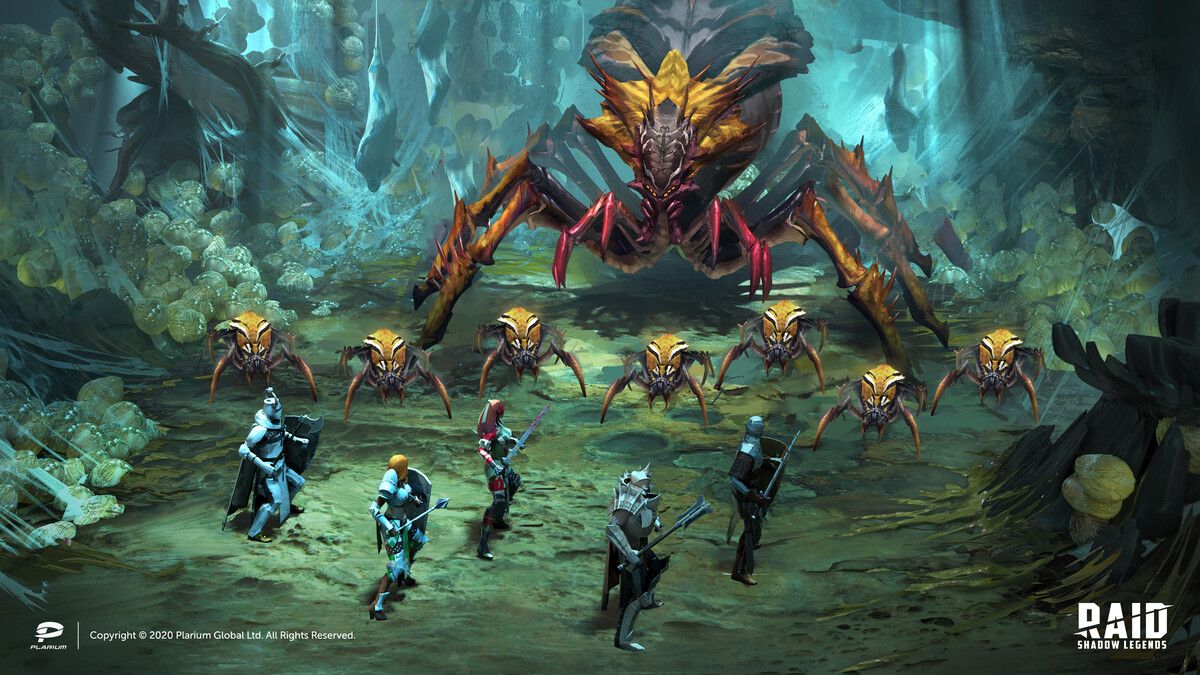
Third skill (passive): Spawns 6 Spiderlings at the start of the battle. Spawns 2 Spiderlings at the start of each enemy Champion’s turn. Spawns 4 Spiderlings at the end of Skavag’s turn. There can be up to ten Spiderlings in battle at any time. Skavag consumes all remaining Spiderlings at the start of each turn. Skavag heals by 3% of her MAX HP for each Spiderling consumed, and permanently increases her ATK by 10% for each Spiderling consumed.
At this stage, with a description of the skills in hand, the concept artist needs to be able to fully visualize how they will look in battle. As an animator, that helps me clearly articulate the overall vision for the animations of each skill, which in turn makes it easier to find the ideas and references which will allow me to create animations that are sufficiently dynamic. Solid visualization at this stage also optimizes the work of the entire art team going forward.
Below are images containing the effects concepts and animation ideas for the skills I was tasked with working on: killing Spiderlings to restore health, and a web attack (the second skill from the list above).
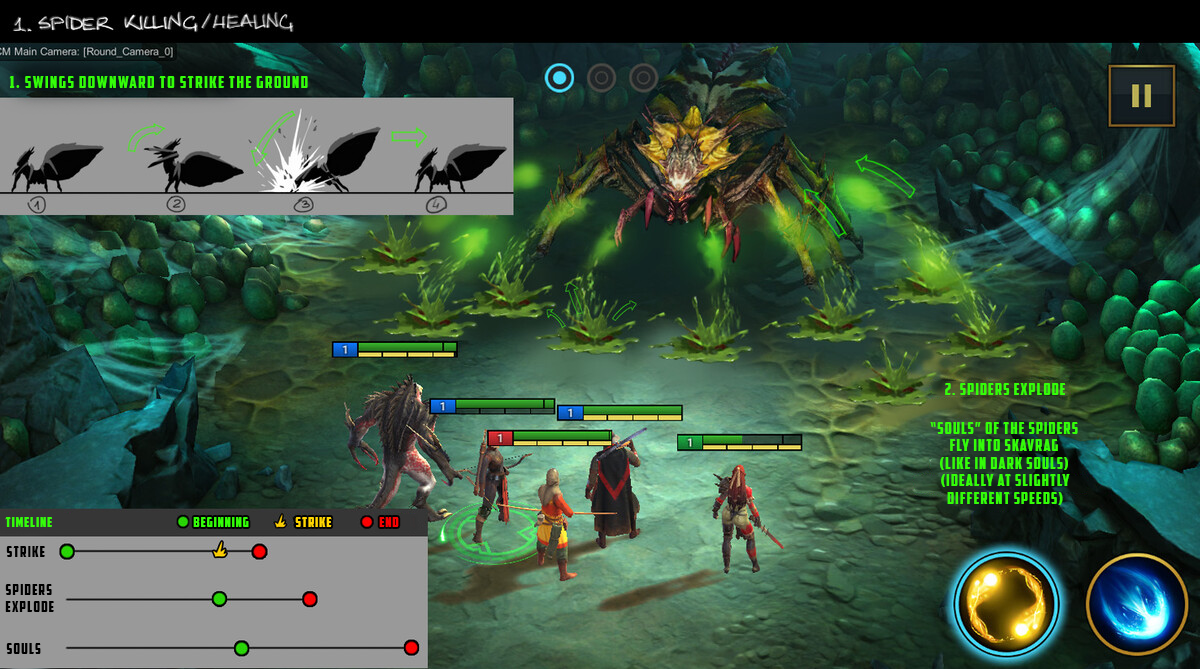 Effects concepts of 2D Art Team Lead Yevgeniy Postebailo
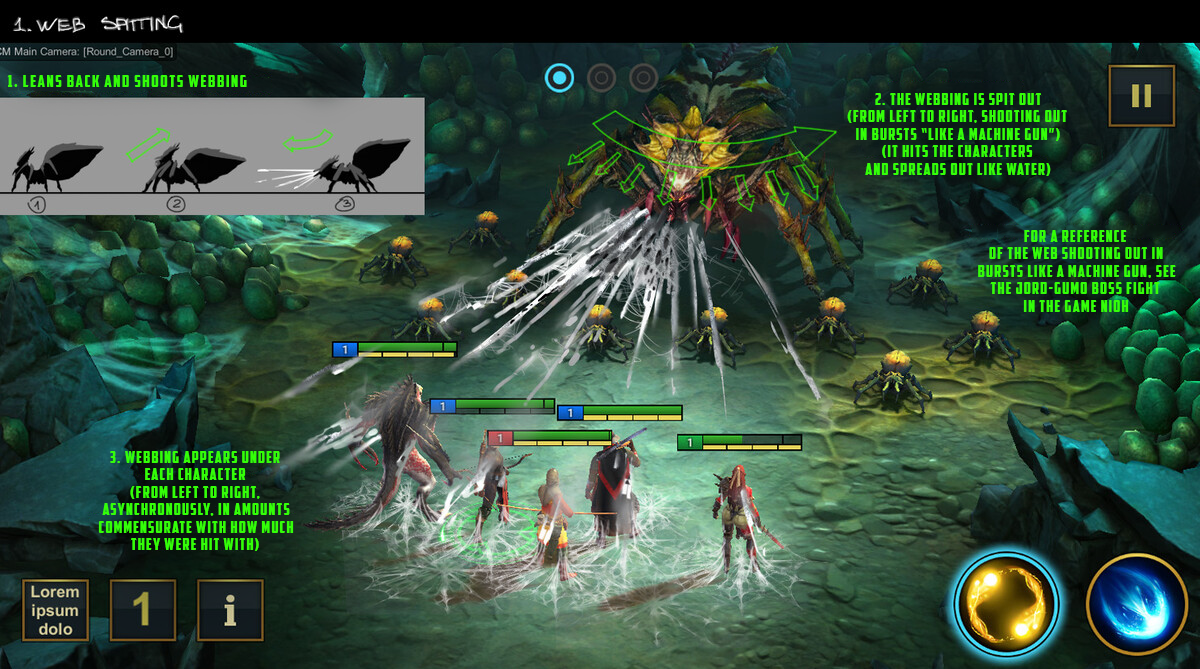 Effects concepts of 2D Art Team Lead Yevgeniy Postebailo
References. Where and how to find them?
The search for references for Skavag’s animations grew to be a significant piece of work. With this sort of task, my strategy is to always first look at the world around us, and so I sought out videos that illustrate the behavior of creatures that are similar in anatomy to Skavag. That’s why films about spiders from the BBC and the Discovery Channel were at the top of my list of things to check out.
Next up, I looked at games and fantasy movies, where visual images of monsters such as giant spiders often crop up. After reviewing a huge number of videos and clips, I was able to better understand the animation decisions around these creatures, and see the moments in which realism was preserved. Such analysis helps me understand how I can exercise creative freedom, while still making sure that my own animations are interesting and unique. Below you can see some of the spider references I studied:
Existing game animations can be found on platforms like Vimeo, Pinterest, and YouTube. And while they do of course help you create your own work, you should never copy them or engage in rotoscoping. They should be used as sources of inspiration and ideas, and sometimes they offer interesting creative solutions or techniques. In the case of spiders, for example, you might find a clip that shows a unique style of leg movement or very good movement timing.
Here were some of the references that I found most helpful:
The references above were greatly useful to me in understanding how Skavag could look and move. But given that she is a mix of beetle and spider, I also had to take into account that she would present unique problems in specific areas like head scales and animations for her wings, two things we’ll touch upon later.
Technical challenges when creating animations for a creature with complex anatomy
Creating any animation, even a simple one, is always a step-by-step process. My pipeline consists of blocking, spline, and polishing, as you can see in the image below.
Of course, I’m always working within the 12 principles of animation, a few of which I’ll touch on in this section, in order to shed some light on the nuances that shape a given animation and make it more interesting. The information will be especially useful for novice animators. We’ll explore these points using examples of anthropomorphic creatures, in particular humans.
All 12 principles of animation are illustrated on Tumblr, and duplicated below.
One of the key things to take into consideration when creating animation is a character’s center of gravity (COG) and the fact that they have a certain weight. Keeping that in mind will help keep poses balanced.
An example of the location of COG in humans:
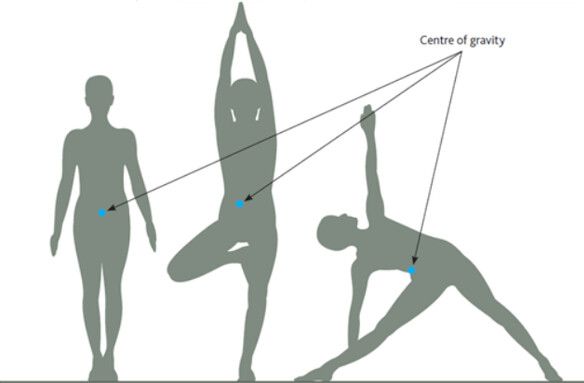
You can read more about balance in the case of a human in this article.
One of the differences between humans and animals is a displaced center of gravity. It’s the reason why animals walk on four legs, and humans only on two. In humans, the center of gravity is in the pelvic area, in cats - in the chest area, above the front paws. If a perpendicular from the center of gravity to the ground is drawn in a cat, then the intersection point coincides with the paw. Accordingly, the front paws carry the center of gravity, while the hind legs provide powerful pushes when running.
An example of the COG location in a cat:
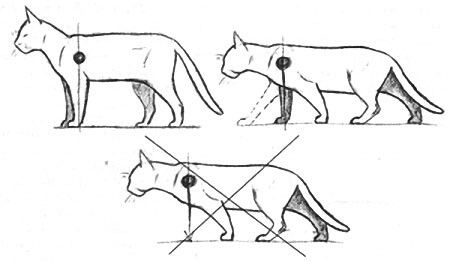
Based on the COG rule, the weight of our spider-like creature Skavag will be evenly distributed between her eight legs, despite her asymmetrical silhouette.
If you want to track the balance of a character, or check timing and spacing, that’s easily done at the blocking stage by creating a rig from primitives. This will also help you figure out if the key poses you've created work within a given animation and are clear to the player, as demonstrated below:

You can learn more about posing and blocking in animation from Serhiy Vynohradov's webinar. He uses anthropomorphic characters as an example to show all the nuances of the concepts.
In nature, all creatures and objects do not move progressively from one point to another, but with acceleration or deceleration. In classical animation, a movement that is slow at the beginning and then increases is called "slow in". Movement, the speed of which is high at the beginning then decreases, is “slow out”. Sometimes a combination of the two options is used, and that’s called “slow in out” (acceleration at the beginning, slowdown at the end). You can read more about this on the blog I want to be...an animator.
This matters because understanding and applying animation principles such as slow in, slow out, and timing, makes the spline process easier.
Returning to arachnids, it is worth noting that they have a significant visual emphasis on their legs. Our boss Skavag has impressive size and, accordingly, weight. Therefore, we needed to demonstrate this, and emphasize the pressure exerted on her legs. The movement of the legs is shown below: on the left - without the “slow out” effect, on the right - with it.
In addition to creating it manually, a similar effect can be achieved using scripts that use dynamics at their core. I’ve listed these scripts in the section below on methods for creating secondary animation.
These aspects, as well as things like a character’s behavior and their way of movement, are what define texture. It’s achieved through timing, styling and poses, and helps to describe the character and make it more interesting. While the concept of "texture" is more often used in acting animation and character performance, it is no less relevant in game animations.
In the case of Skavag, texture not only demonstrates how the weight of the body affects the movement of our creature’s legs, it also adds realism and accentuates the creature's overall character.
Below is a comparison example of idle animations, the movements that a character makes while waiting. We can see that in the animation on the right, the creature seems to be more "alive". This is achieved with the movement of the abdomen, implemented as an action with a displacement (an overlapping action), and with the help of the movement of the pedipalps - the front "antenna", which are secondary animations.
On the topic of overlapping action, I advise you to see Richard Lico's demo Overlapping Action Through the Miracle of Physics. There, he demonstrates the use of his script, which is based on particle goals, and which imitates micro-movements of the body and muscles — the so-called jiggle effect. I also recommend you check out Richard’s Animating With Aim Constraints tutorial, where he demonstrates how to create an animation using constraints.
Secondary animation, meanwhile, is the details and movements that support the main action of a character or object. They are intended to complement and reinforce the main action, or are used to draw the viewer's attention to other actions. In general, secondary actions enrich the animation and give it a new dimension. Therefore, your observations of the surrounding world, attention to detail, and your ability to apply what you learned from your observations are all of great importance when it comes to animating your character.
Taking the example of the death cycle of a spider-like creature, you can see below how the additional movements of legs, wings, head scales, and front legs make the animation more interesting.
Here are some details about the methods of creating secondary animation in this cycle:
- The front legs combine dynamics, layered animation and keyframe animation
- The wings and head scales are keyframe animations that use animation layers, a tool in Autodesk Maya that helps make movements or effects more interesting and believable.
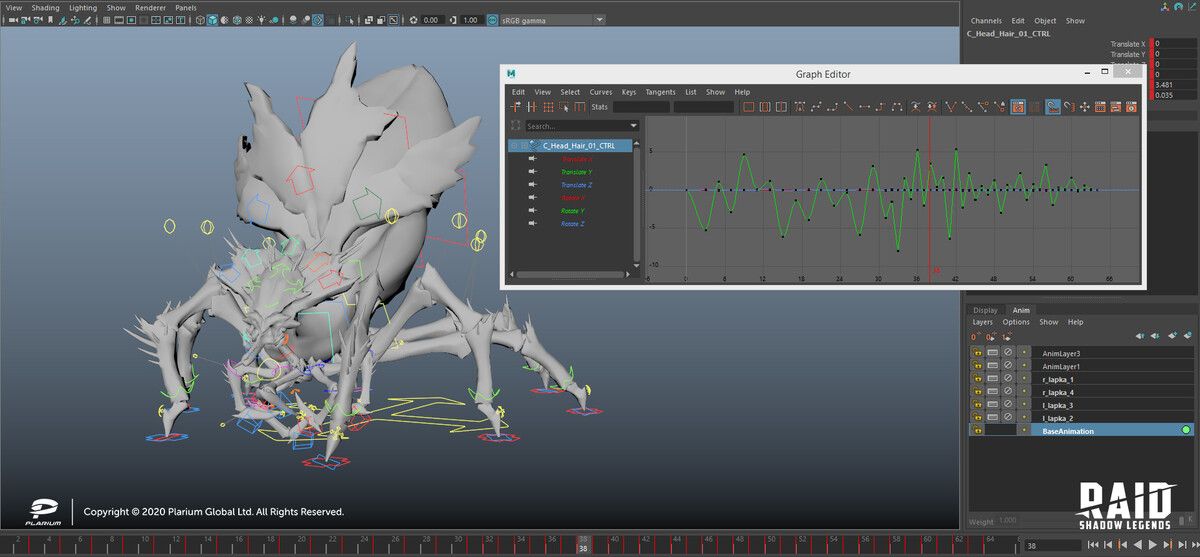
The rattling effect of the head scales and wings can be achieved as shown in the animation curve ("rotate y"), which you can see in the image below (the “Graph Editor” window). This kind of curve is created manually or using the "noise" tool from the Animbot plugin.
In the video below, I demonstrate one of the ways to work with the Spring Magic script, a tool that can create a dynamic animation of a chain of bones.
To learn more about scripting and how to create secondary animation using dynamics in Maya, watch the video "How to create secondary animation using dynamics in Maya" by rigger Anton Paryhyn.
You can also check out the following video tutorials on creating animation layers:
- Tutorial: Additive & Subtractive Motion
- stream "How to properly prepare animation layers" with Andriy Evdokymov.
Useful tools and resources for professional development
To increase your own efficiency when creating animation, you need to optimize the software you use. Optimization includes the creation of scripts, hotkeys, and the use of plugins.
The following tools and scripts can come in handy:
- AnimBot is a plugin with many features used to optimize the animation process. You can learn more about the tools on the Animation time YouTube channel.
- Spring Magic is a script that can create dynamic animation, it is widely used to simulate clothes and hair.
- OverLapper is a script that can create an overlapping action for a chain of bones. It’s useful for simulating tails, clothes, and hair.
- Graphite 9 is a set of scripts designed to simplify the animation process.
- Tools - Morgan Loomis - a collection of tools for Maya.
- Tool Chefs - a set of tools used to automate animation.
- Workflow Scripts - Aaron Koressel - a set of scripts used to optimize the animation process.
- Studio Library is a tool that allows you to create libraries of poses and animations in Autodesk Maya.
To find new creative and technical solutions, it’s important to watch various video resources and webinars. For example:
- Game Developers Conference
- Animation School Streams - webinars and master classes
- Animation School Streams - podcasts
- Maya Learning Channel
- 3dpapa - articles
- Animbreak Episode by Jason Shum
- iAnimate.net - podcasts
A good understanding of the principles of animation will help make your work much more interesting and effective. And if in addition to that you also take your observation technical skills to the next level, and expand your toolkit, then there will be nothing scary about animating any creature, even one with eight legs!