CI/CD: the fail-fast approach in Nuke
This text is a translation of an article originally published on DOU.ua.
My name is Vladislav, and I'm a .NET Developer at Plarium. In this article, I will explain what fail-fast design is, how it is implemented in Nuke, and how I imagine fail-fast tools will develop in future through that program.

I work in the Game Platforms department, which deals with game development. We develop the Plarium Play gaming platform, the plarium.com gaming portal, the forum for player interaction, useful things for internal use, and a lot of landing pages and microservices.
Such a wide array of projects requires a reliable and scalable continuous integration and continuous deployment (CI/CD) system. So, we use Jenkins and Nuke together: Nuke is used for most of the logic for building/deploying a particular project, and Jenkins takes care of the UI functions for displaying all jobs, triggers associated with repositories, and the setting up of links between jobs.
We have an internal Nuke-based library so we can recycle the code used in CI/CD. It slightly extends the standard functionality of the framework and contains Targets (in Nuke – a single build/deploy step). Since our library only extends Nuke, it is designed within the approaches used in the framework. One of these approaches is fail-fast design, which allows you to avoid wasting time on processes that obviously won’t be successful and lets you start code build/deploy processes more reliably.
What is fail-fast design?
When an error occurs in a program, it is important for the programmer to find it in the code as soon as possible so they can fix it. Finding the cause of the bug or error, however, isn’t always easy.
One tool that speeds up the bug-search process is fail-fast design. Jim Shore defines fail-fast design as an approach where exceptions are thrown as close as possible to where the problem occurs.
Let's look at an example of C# code to clarify:
internal class Program
{
  static void Main(string[] args)
  {
    var instance = new SomeClass(null);
    instance.SomeMethod();
  }

  public class SomeClass
  {
    private readonly string _importantField;

    public SomeClass(string importantField)
    {
      _importantField = importantField;
    }

    public void SomeMethod()
    {
      Console.WriteLine(_importantField.Length);
    }
  }
}
In this example, a NullReferenceException will occur inside the method SomeMethod(), because _importantField is null. In real code, between the initialization of the class SomeClass() and the call of the method SomeMethod(), the number of intermediate actions can be much larger, which makes it difficult to find what caused the bug.
Using the fail-fast approach for this example, we have:
public SomeClass(string importantField)
{
  _importantField = importantField ?? throw new  ArgumentNullException(nameof(importantField));
}
Meaning that _importantField is checked much earlier.
Thus, fail-fast design can be described as a design principle for complex systems — a method that prompts the system to report conditions that may indicate its failure as early as possible. From here, you can take steps to prevent the recurrence of the error.
Using Fail-fast Design in Build Automation Systems
The fail-fast approach is valid when writing any code, including code for building automation systems. But the code for CI/CD has a couple of distinctive features:
- A shorter lifecycle compared to other applications: it lanches, performs a defined number of actions, then ends.
- Lack of interaction with the user as the work progresses – that is, the code receives all the necessary parameters at the start
How do those features affect fail-fast design? First, for CI/CD code, "fragility" is not as critical as it is for other applications. On the contrary, it’s important to stop a potentially erroneous process as soon as possible (ideally, you wouldn’t even start it).
Second, since the program receives all the parameters at the start, it is possible to immediately identify whether those parameters will work properly or not. This means you don’t even need to start a potentially error-ridden process, because the checking (and if necessary, stopping) of the program comes at the very beginning of the process.
The Benefits of Detecting Errors Early
Of course, detecting errors in the early stages of building an application will save you time. Building or deploying code is part of the overall workflow, which means it will impact the wider project timeline. Volume tests, for example, can run for a significant amount of time in some cases.
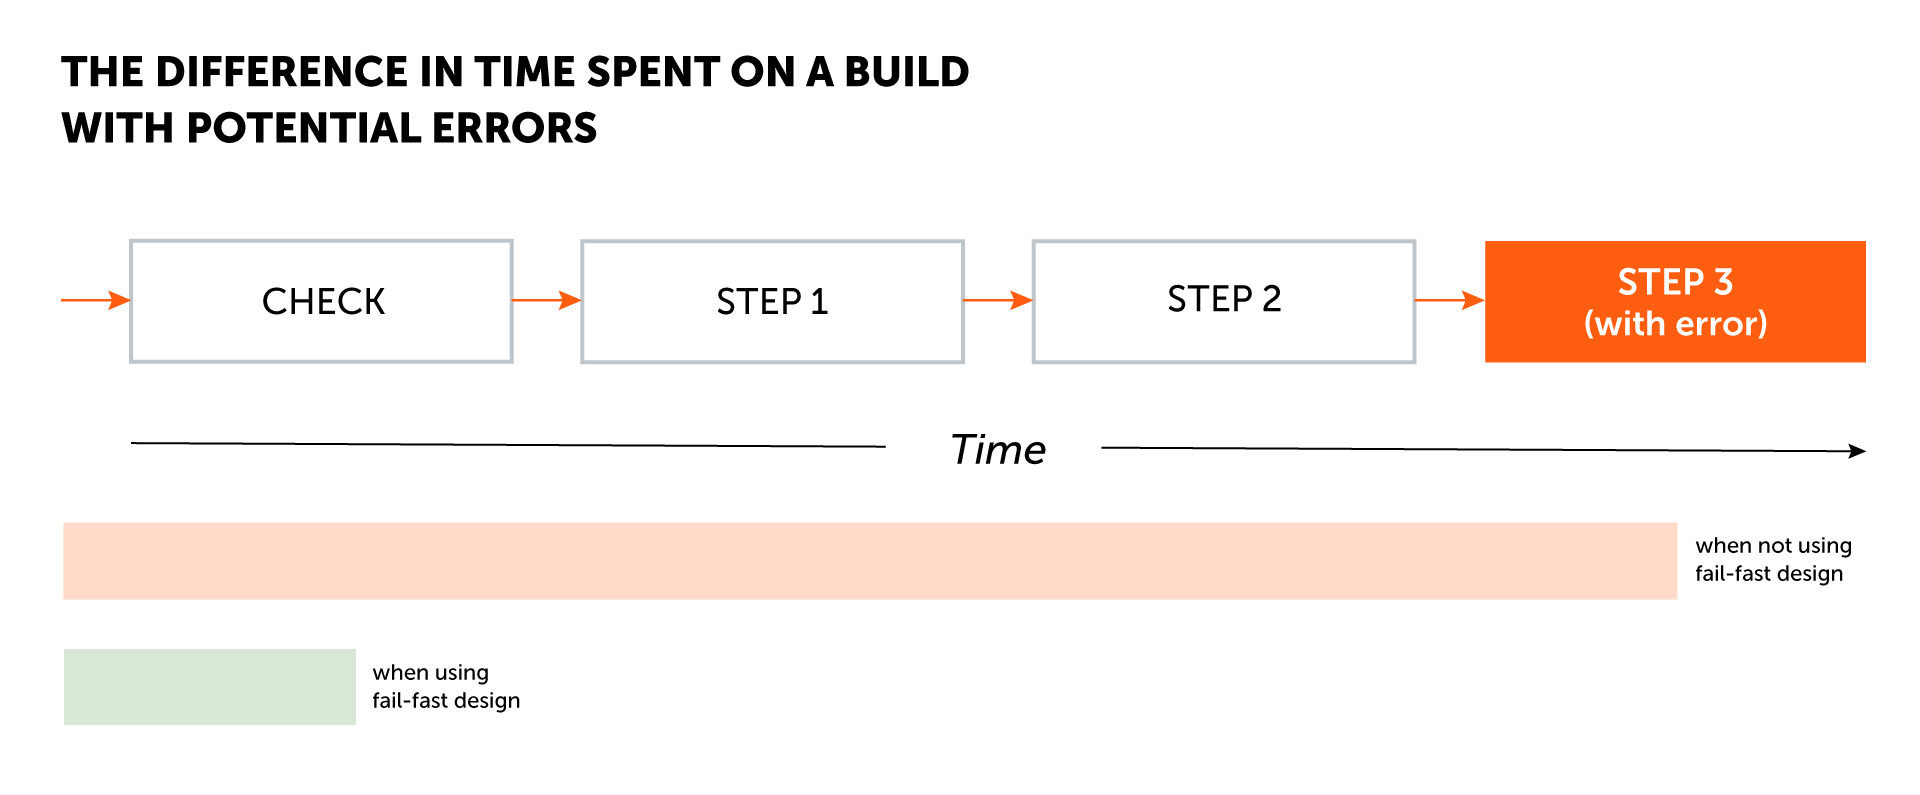
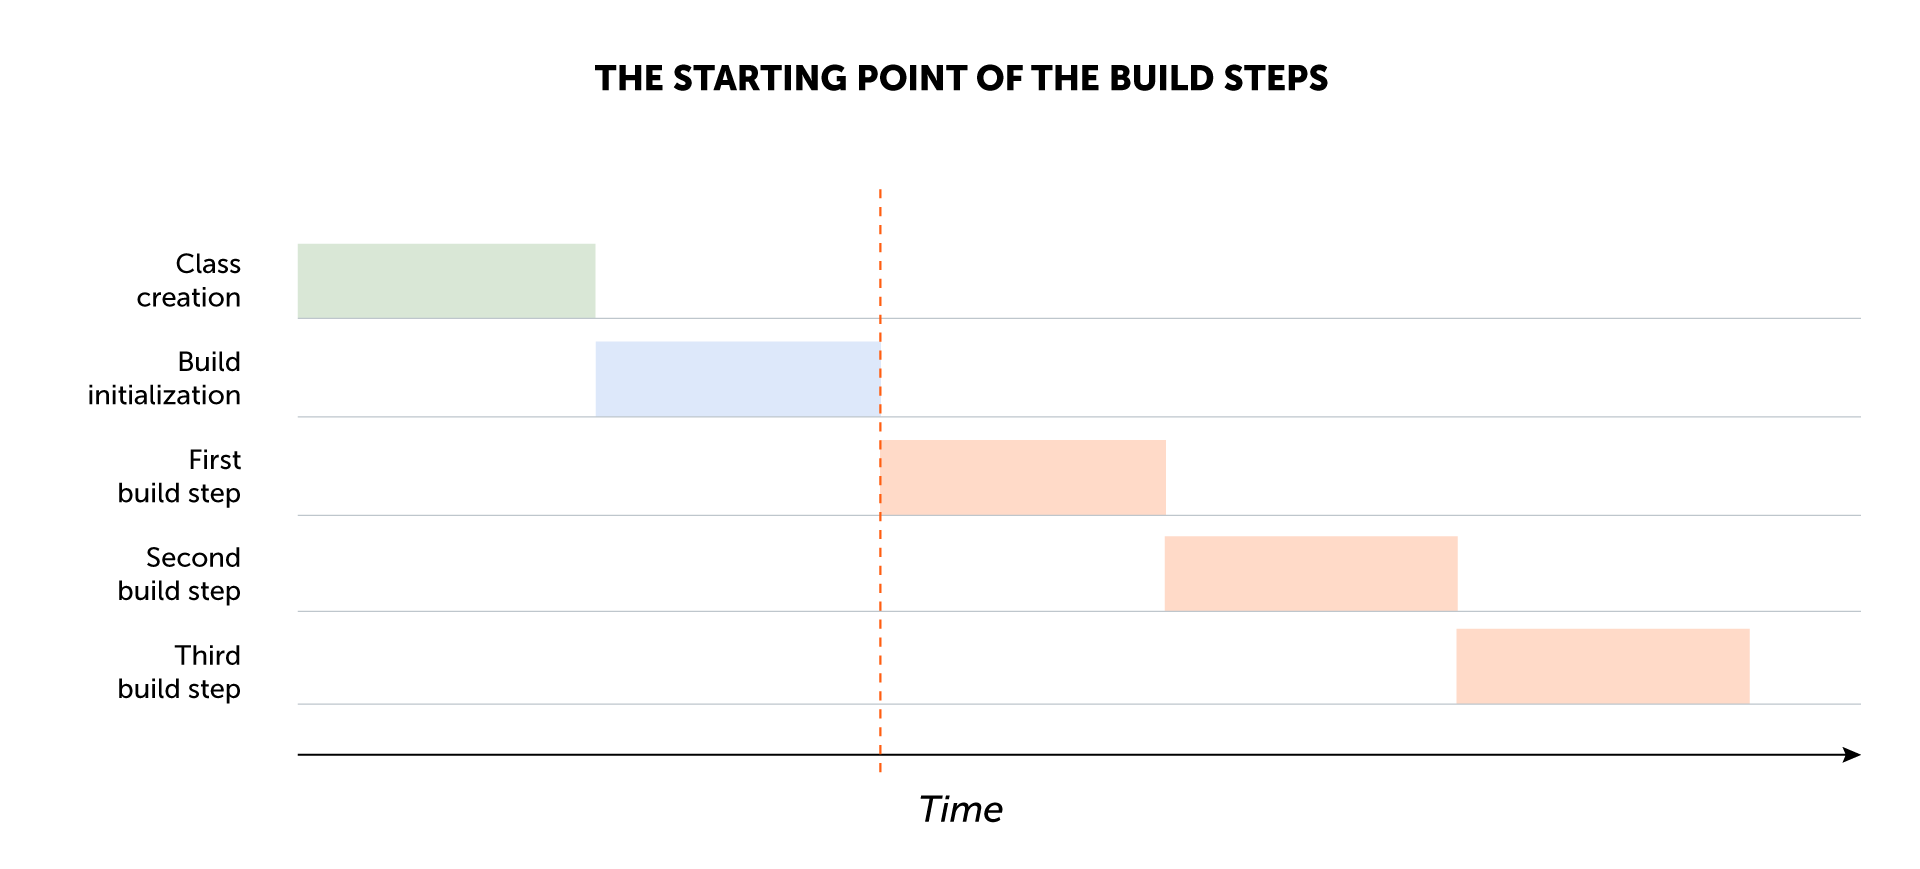
And there’s another benefit to using this approach for CI/CD code. To illustrate, let's analyze a sequence of actions that should be familiar to everyone:
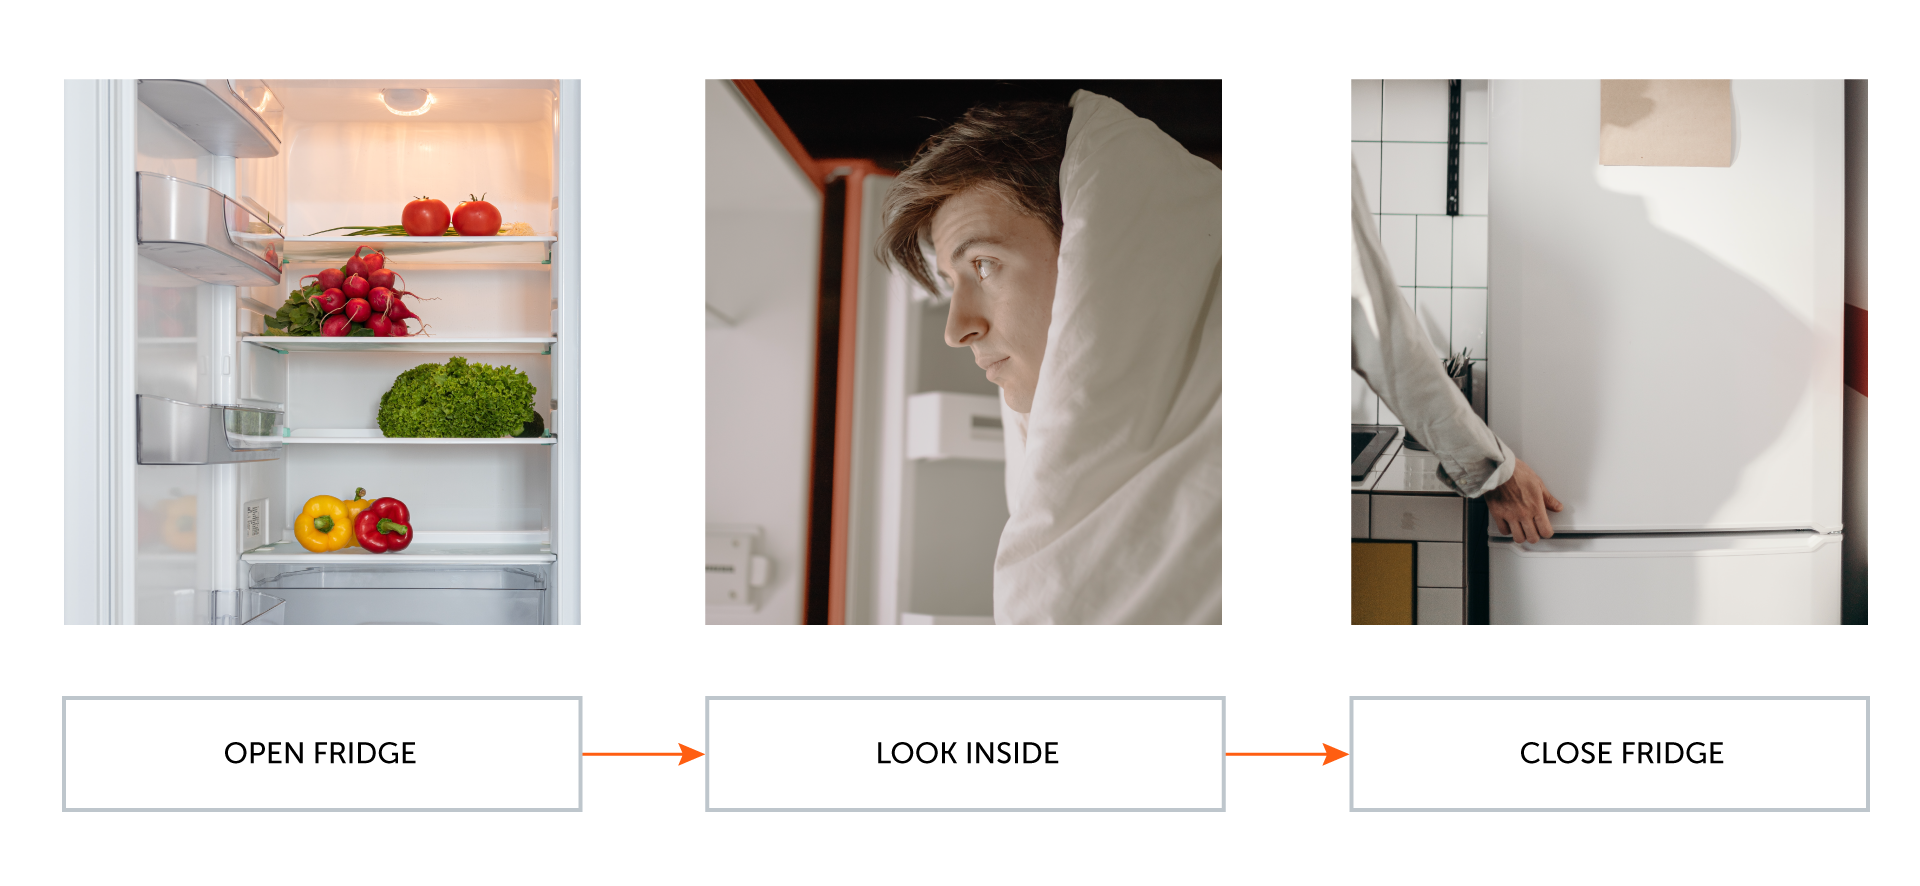
If an error occurs during the «Look» step, the fridge door will remain open, which will negatively affect its working state.
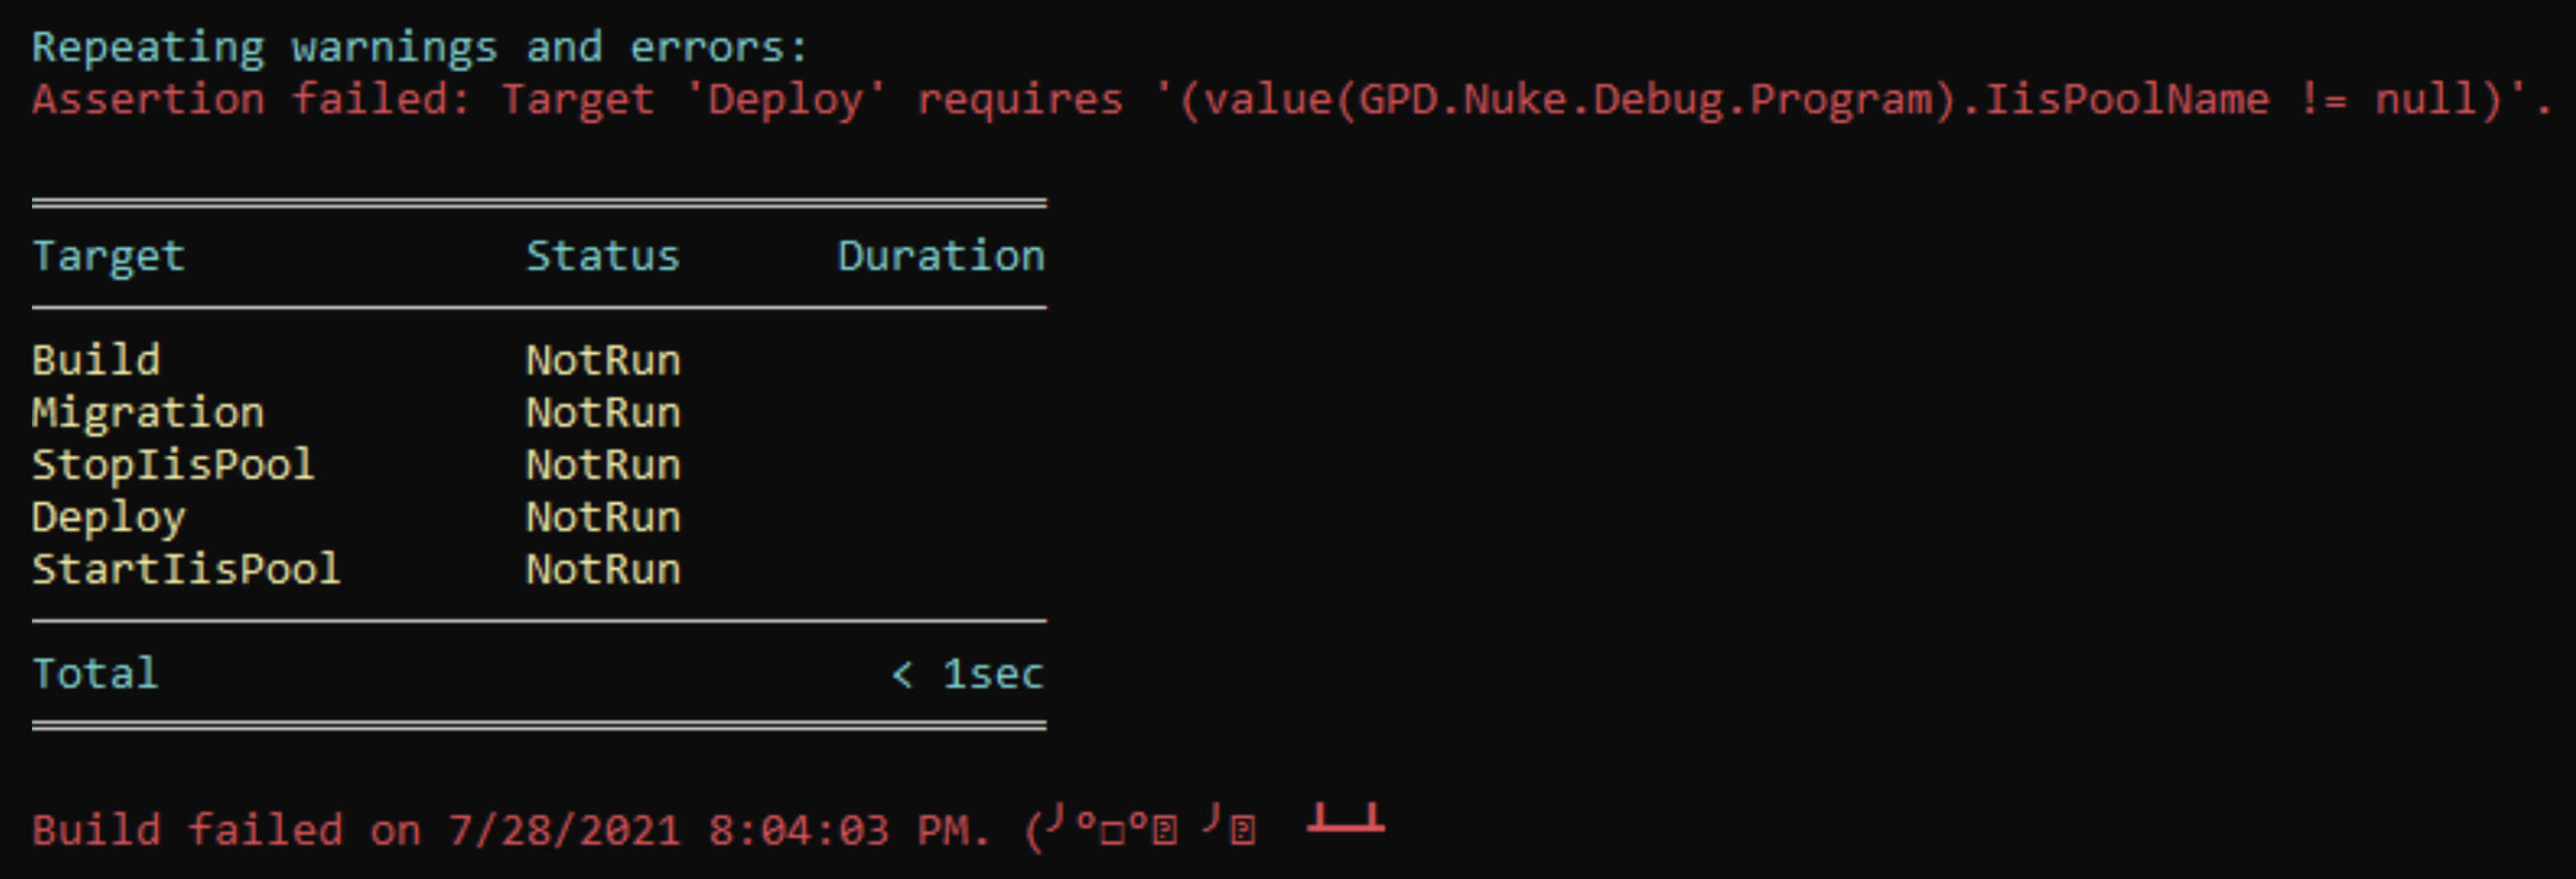
The same logic can be found in code deployment plans. Let’s look at an example of a web application deployment plan:

What happens if something goes wrong at the Deploy step? It is logical that the build will fail and our code will not be deployed to the desired environment. But besides that, it is worth considering that the Build, Migration, and StopIisPool steps have already been completed. This means that the pool is also turned off and the application does not work, although it could.
Implementing only a few steps in the code deployment process can lead to decreased application performance. But the fail-fast approach won’t even allow such code to be deployed in the first place.
Spoiler
The example above shows migration. Perhaps someone might ask “Why?”, because it can be used at the time of application start.
It’s because running migration can also be considered an implementation of the fail-fast principle. Suppose migration contains some errors and cannot be executed. If we apply such a migration at the start of the application, we will get an inoperable application. With the approach shown in the diagram above, we’ll see problems with migration before the code is published.
Some might think that the pipeline is the source of the problem, and to eliminate that problem, the inclusion of the pool is mandatory - regardless of everything else. But fail-fast design pushes you to think: “Why launch something that will crash anyway?” “Could we have known the build would fail before it was started?”
Inappropriate joke
It’s better not ask yourself the age-old question: “Why run something that will crash anyway?” Because then, you might stop writing code altogether…
What is Nuke?
Nuke is an open-source framework for building and deploying applications. This is a C# console application, which means that you can use any NuGet packages and get all the benefits of C# and IDE features when coding. This is what distinguishes Nuke from other frameworks - none of the above can be used in, say, Cake.
Nuke offers some convenient ways to:
- Pass parameters via command line arguments
- Build connections between build stages
- Implement fail-fast design for parameters
- Visualize build stages
Nuke also offers a large number of command-line interface (CLI) tools with a description that matches official documentation, along with a mechanism for adding your own CLI tools.
You can learn more about Nuke here, and find the project’s source code on GitHub.
Parameter Checks
Nuke allows you to set required parameters, so that before starting the build/deploy process, a check is made to see if all necessary requirements have been passed. If even one of these parameters is missing, the process will not be started, and the user will receive a message indicating the reason why.
Look at this example:
private Target Deploy => _ => _
  .Requires(() => IisPoolName!= null)
  .Requires(() => IisPoolName) // Null check can be simplified
  .DependsOn(StopIisPool)
  .Executes(() => { });
A detailed explanation
Target in Nuke — this is a delegate, and thus such a “doubtful” construction in the form of a smiley appears => _ =>
.DependsOn(StopIisPool) shows that build stage Deploy depends on the stage StopIisPool, and that means that before executing Deploy StopIisPool must be executed.
.Executes() — the very essence of the target, the code that is directly executed in it.
.Requires() method is used twice in the example to show different ways of calling it.
The Requires method indicates that there is some required condition that must be checked before all targets are executed.
Footnote
You might be wondering: why is a parameter conveyed with a lambda?
Nuke has a peculiar life cycle: creating an instance of a class and initializing parameters do not happen at the same time, so if you just pass a parameter, then it will have an uninitialized value (i.e., the default value). Passing a lambda allows you to get the value of the parameter at the same time as the Requires method is executed.
If we now run Nuke with the Requires method added, we get the following:
As you can see, none of the targets were executed.
The Requires method takes on Func<bool>.
This means that you can check not only the parameters, but pretty much anything else!
Additional Information
When you start Nuke, you need to input the steps that the framework needs to perform. At the same time, links between steps are specified in the project files.
For example, the Deploy step depends on the Build step, and the Build step requires the SolutionPat parameter.
Then, when starting the build with the Target Deploy parameters, we will see a message that the build was not started due to the absence of the SolutionPath parameter.
So, Nuke first builds a step execution graph, and then checks for the presence of parameters for each of the steps in the graph.
Build Sequence Check
In addition to the Requires method, Nuke has a build sequence check. The sequence is specified using the DependsOn, DependsFor, After, Before methods and their Try versions.
For example:
public Target SomeTarget => _ => _
  .DependsOn(NextTarget)
  .Executes(() => Console.WriteLine("SomeTarget"));

public Target NextTarget => _ => _
  .DependsOn(SomeTarget)
  .Executes(() => Console.WriteLine("NextTarget"));
Here, SomeTarget depends on NextTarget, and NextTarget on SomeTarget - meaning we’re getting a circular dependency. If we run this example, we get:

This check is also performed at the start of the application, before the build steps start.
CLI Tools Check
Nuke has a rather convenient way of working with CLI tools. We’ll go into it a little bit now, but you can also read more about it here.
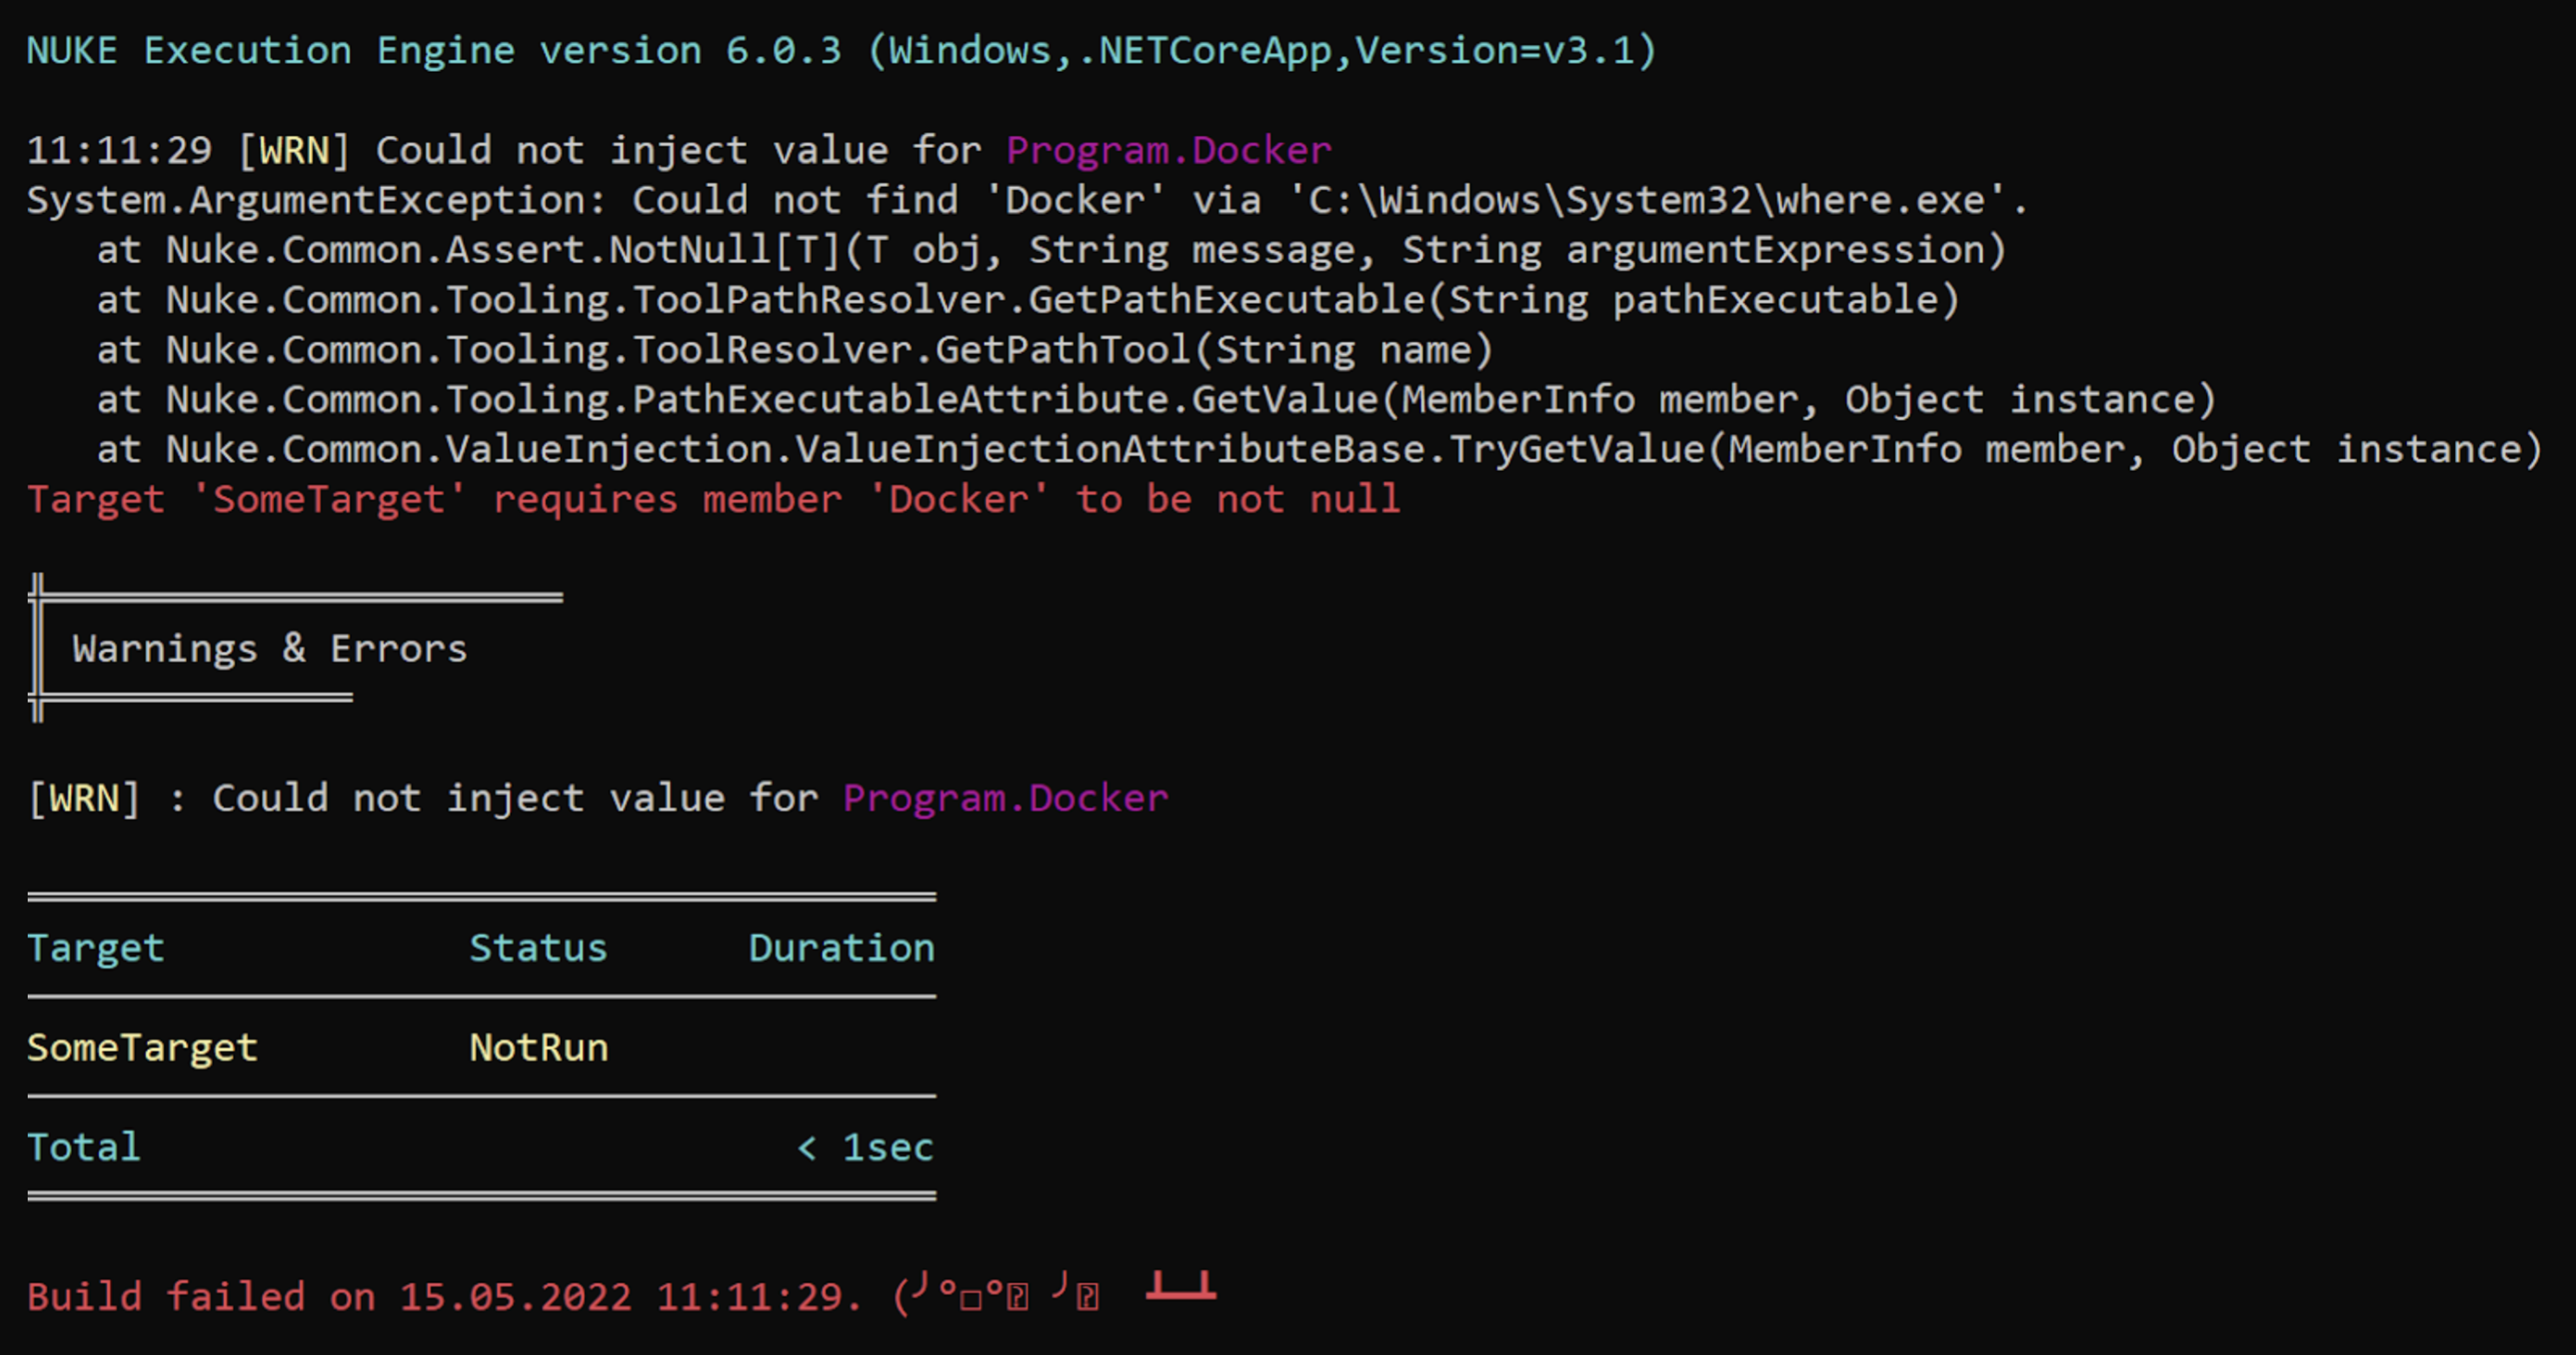
Let's look at an example. Here, we’re trying to use the docker CLI on a device where it’s absent:
[PathExecutable]
public Tool Docker;

public Target SomeTarget => _ => _.Executes(() => Docker.Invoke("info"));
Here, we declare the CLI tool through the Docker field and use SomeTarget at the build stage. As a result, we get:

The body of text in the green box is the part that was completed before the build steps started. The red box indicates the actual execution of the build steps.
So, before starting the build, Nuke checked whether there is such a CLI type or not, but limited itself to reporting a possible problem. Further, when trying to use the CLI tool directly, we get an error, and the build fails.
You can use the fail-fast approach for the CLI tool in the same way we do for the parameters. Add the Requires method like so:
[PathExecutable]
public Tool Docker;

public Target SomeTarget => _ => _
  .Requires(() => Docker)
  .Executes(() => Docker.Invoke("info"));
Then, when we try to run the build, we get:
There is only one drawback: the check and the message about the absence of the CLI tool will always occur, even if you call the build steps that do not require that CLI tool. This can be a little confusing when going through the logs, but it’s not really a big problem.
Fail-fast Tool Extension Options
In order to extend the existing fail-fast tools, you need to understand the life cycle of the Nuke project. The entry point of a Nuke project is a single NukeBuild base class:
static int Main(string[] args) =>
   Execute<Program>(x => x.DefaultTarget);
In the Execute<T> method, a Nuke class is passed through the generic parameter.
As you can see from the example, the class initialization takes place “under the hood” of Nuke, which means you cannot pass additional arguments to set up the class. Let’s remember this for later.
We’ve previously determined that the essence of the fail-fast approach is to recognize as soon as possible — ideally before the build steps start — that the build will fail, and not run it. We also figured out what is already implemented in Nuke, namely:

Don’t forget that all three types of fail-fast checks above pass before the start of the build steps. So, when extending fail-fast tools, you should also run their checks before starting the build steps.
Now, we’ll take the errors that can occur in the CI / CD code and divide them into groups:
- inside the code
- related to external services – e.g., access to the database, access to external services using the API, use of CLI tools
- environment-related – e.g., lack of environment variables, administrator rights, access to certain folders
- associated with parameters – e.g., the absence or invalid value of a parameter
There is no way of preventing errors inside the code, but we can apply a fail-fast approach to the other three items on this list.
Preparing for the Fail-Fast Extension and Transferring Logic to Service Classes
In smaller projects, it's pretty easy to put all the logic inside .Execute(). But as the number of Targets and the logics within them increase, problems arise with code reuse and with the fact that the Nuke class starts to become very large. In this case, it’s better to move all the logic into separate classes, and then simply reuse them inside Targets.
To test the hypothetical service used in the third build step, we need to ensure that we use the same service instance in both the test step and the build step.
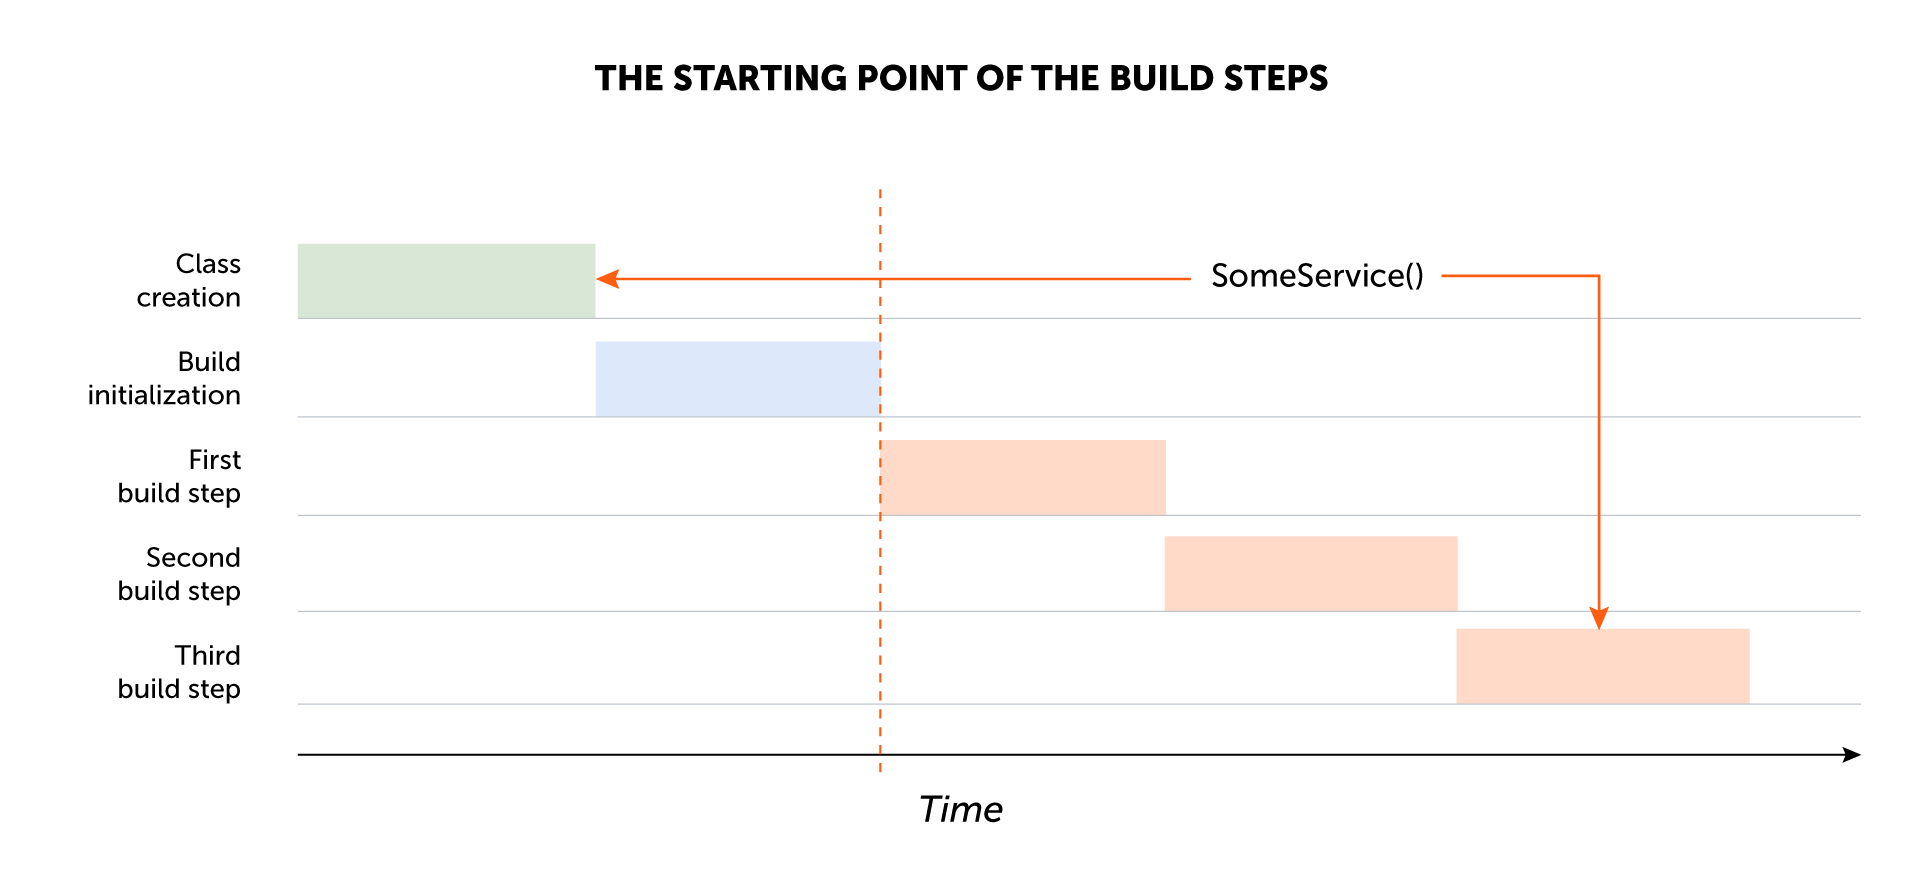
The simplest solution is to make such service classes static. As mentioned earlier, an instance of the Nuke class is created “under the hood” of the framework, which means it’s impossible to pass instances of service classes to it. An alternative to using static service classes is dependency injection (DI), which is my preferred approach.
Nuke as a framework does not have a ready-made DI implementation, so I use an add-on based on the Microsoft.Extensions.DependencyInjection NuGet package. But, if you replace DI with another implementation, nothing fundamentally changes. I use DI solely to create all the necessary classes before building, and to ensure that I will use the same instance of the class that I checked in the build steps.
An Example of Adding Dependency Injection to Nuke
Another feature of Nuke projects is that build steps and parameters can be described either: (a) inside a NukeBuild inherited class, or (b) in interfaces as the default implementation.
This means that both the NukeBuild inherited class and the interfaces must have access to the DI container. It makes sense, then, to make this class static.
Here is an example code for such a class:
public static class NukeDependencies
 {
   private static bool _isAlreadyInitialize;
   private static IServiceProvider Container { get; private set; }

   public static T Get<T>() => Container .GetRequiredService<T>();

   public static object Get(Type type) => Container .GetRequiredService(type);

   internal static void RegisterDependencies(Action<IServiceCollection> registrations)
   {
     if (_isAlreadyInitialize)
       throw new Exception("Can't register dependencies twice");

     var services = new ServiceCollection();
     registrations.Invoke(services);
     services.AddSingleton<IServiceCollection>(services);
     C data-removed= services.BuildServiceProvider();
     _isAlreadyInitialize = true;
   }
}
Here is an example code for a class that provides dependency injection:
public abstract class NukeBuildWithDependencyInjection()
{
  protected NukeBuildWithDependencyInjection()
  {            NukeDependencies.RegisterDependencies(AddOrOverrideDependencies);
  }
  protected virtual void AddOrOverrideDependencies(IServiceCollection   services)
  {
    services.AddSingleton<INukeBuild>(this);
  }
}
Registration in the DI container occurs through the AddOrOverrideDependencies method, which can be overridden in descendant classes by adding new dependencies. You can get instances of classes from a DI container by calling NukeDependencies.Get<T>() inside the .Execute() method.
Thus, we get something like this:
//An interface describing the build step and its parameters
public interface ICanDoSomething: INukeBuild
{
 [Parameter]
 public string Test => TryGetValue(() => Test);

 public Target DefaultTarget => _ => _
   .Requires(() => NukeDependencies.Get<SomeService>())
   .Requires(() => NukeDependencies.Get<SomeOtherService>())
   .Executes(() =>
   {
     var someService = NukeDependencies.Get<SomeService>();
     var someOtherService = NukeDependencies.Get<SomeOtherService>();
     someService.DoWork(Test);
     someOtherService.DoOtherWork();
   });
}
//Nuke class implementing above interface and dependency injection
class Program: NukeBuildWithDependencyInjection, ICanDoSomething
{
  static int Main(string[] args) =>
     Execute<Program>(x => ((ICanDoSomething)x).DefaultTarget);

  protected override void AddOrOverrideDependencies(IServiceCollection services)
 {
   base.AddOrOverrideDependencies(services);
   //We register the services that we plan to receive from the container
   services.AddSingleton<SomeService>();
   services.AddSingleton<SomeOtherService>();
 }
}
At first glance, the implementation of this approach (putting the logic into service classes and registering them in the DI container) doesn’t have a fundamental effect on fail-fast. However:
- All dependencies are automatically checked for service classes that are registered in the DI container
- Due to
.Requires(() => NukeDependencies.Get<Т>())it becomes possible to specify which service classes are required for each of the build steps, and check them before the start - The description of the check is transferred inside the service class, namely, into its constructor. Thanks to this, the description of the build steps becomes simpler and clearer – you cannot duplicate the
Requiresmethods in different build steps - There is no need to perform parameter validation through the
Requiresmethod. Parameters can be obtained inside service classes – through theINukeBuildinterface, converting it to the required interface with a parameter. It is much more logical to perform parameter checks inside service classes, because it is clearly visible both where and how they are used.
Such are the benefits of this approach. Nonetheless, the resulting system also has a number of shortcomings:
- Getting instances of classes from containers inside the
Executemethod looks rather cumbersome and hard to read - There is a need for each stage of the build to explicitly indicate (through the
Requiresmethod) which service classes will be used in it (in theExecutemethod). If one of the service classes is not specified in this way, then fail-fast won't' work for it - If, for example, 20 classes from the DI container are used inside the
Executemethod, then the description of the build stage (Target) will be cumbersome and difficult to read due to the huge number ofRequiresof the same type
To eliminate thеse shortcomings, a «thin Execute» approach is used, which complements the system described above.
An Example of the Implementation of «Thin Execute»
«Thin Execute» (similar to a "thin client" or "thin controller") is an approach in which the Execute method should contain a minimum of logic and, in fact, delegate the work to the desired class. To use «Thin Execute», you need to define an interface for the classes that will contain the logic of the build steps:
public interface INukeTargetAction
{
  void Invoke();
}
You’ll also need an extension method for easier use:
public static ITargetDefinition Executes<T>(this ITargetDefinition targetDefinition) where T : INukeTargetAction
{
  targetDefinition.Requires(() => NukeDependencies.Get<T>() != null);
  targetDefinition.Executes(() => NukeDependencies.Get<T>().Invoke());
  return targetDefinition;
}
Now, the build step will look like this:
public interface ICanDoSomething: INukeBuild
{
  [Parameter]
  public string Test => TryGetValue(() => Test);

  public Target DefaultTarget => _ => _.Executes<TargetAction>();

  public class TargetAction: INukeTargetAction
  {
    private readonly string _someField;

    public TargetAction(INukeBuild nuke)
    {
      //Please note that the parameter check happens inside the TargetAction
      var parameterC data-removed= (ICanDoSomething)nuke;
      _someField = parameterContainer .Test ?? throw new  ArgumentException(nameof(interfaceWithParameter.Test));
    }

    public void Invoke()
    {
      Console.WriteLine($"I do some work now, _someField - {_someField}");
    }
  }
}
And a Nuke class using this build step via interface implementation:
class Program: NukeBuildWithDependencyInjection, ICanDoSomething
{
  static int Main(string[] args) =>
      Execute<Program>(x => ((ICanDoSomething)x).DefaultTarget);

 protected override void AddOrOverrideDependencies(IServiceCollection services)
 {
   base.AddOrOverrideDependencies(services);
   services.AddSingleton<ICanDoSomething.TargetAction>();
 }
}
I will note that everything related to the logic of the build stage is contained in the TargetAction class. In the Nuke class, we have only the registration of dependencies in the container.
This approach provides the following benefits:
- The same instance of the class previously registered in the container will be used throughout the code (unless specified otherwise during registration)
- With the
Executes<T>extension method, the class is checked before the build steps even beginAll dependencies of the specified class are automatically checked, so there’s no need to manually specify all the classes to be tested - An intuitive way to get dependencies from a DI container is simply through the class constructor, without «duct tape»
- The class check happens in the constructor and its format can be quite flexible. You can, as in the example, simply validate properties. And in the case of complex verification logic, you can move it into a separate method and call it in the constructor
- The ability to test code inside the
Executemethod. By default, code is passed to theExecutemethod as a lambda, which makes it difficult to test accordingly - Shifting the validation logic from the build step description (Target field) to the constructor of each service class. It makes sense to describe the verification logic while designing the class
An Example of Using an Extended Fail-Fast Approach
In the previous two sections, we looked at how to create a system that implements an advanced fail-fast approach. When creating the logic of your personal Nuke project within this system, you should describe the logic for checking service classes inside the constructor.
Checks inside a class constructor can be completely different - it all depends on the function of the class. For example, you can make a test request to external resources, try to open database connections, or create a file in the required directory.
Applying the approach described above, you can get a convenient and visual system that complements and uses the built-in Nuke fail-fast design. It cannot be said that this approach fully implements automatic verification, since inside each service class it is necessary to describe the verification logic. But the use of IServiceProvider makes the system automated, and thus all dependencies will be built (and therefore checked), and there is no need to specify which services need to be checked.
Finally, let’s look at an example of the implementation of an abstract http client for Nuke.
Suppose that a Nuke project needs to use several external services. Logically, we should make an abstract client that will check the availability of the host at the very start, and at the same time will verify the correctness of the host itself.
Such a class might look like this:
public abstract class AbstractClient: IDisposable
{
  protected readonly Uri BaseUri;
  protected readonly Ping PingSender;
  protected readonly HttpClient HttpClient;

  protected AbstractClient(string baseUrl, Ping pingSender)
  {
    BaseUri = new Uri(baseUrl);
    PingSender = pingSender;

    HttpClient = new HttpClient
    {
      BaseAddress = BaseUri,
    };
    PingHost();
  }

  private void PingHost()
  {
    PingReply response;
    var host = BaseUri.Host;

    try
    {
      resp data-removed= PingSender.Send(host);
    }
    catch (Exception exception)
    {
      //Solely to make the error clearer and more readable
      throw new Exception($"Some problem while create service [{GetType().Name}], ping [{host}] exception - {exception.Message}");
    }

    if (resp data-removed== null)
      throw new Exception($"Some problem while create service [{GetType().Name}], ping [{host}] response is null");

    if (response.Status != IPStatus.Success)
      throw new Exception($"Some problem while create service [{GetType().Name}], ping [{host}] response status is {response.Status}");

    Console.WriteLine($"External service [{host}] pinged successed");
  }

  public void Dispose()
  {
    PingSender?.Dispose();
    HttpClient?.Dispose();
  }
 }
}
We implement the abstract class in the conditional test client:
public class TestClient : AbstractClient
{
  //I want to draw your attention to the fact that the BaseUrl for the client is passed as a parameter.
  // This can be useful in cases where the url might change depending on the environment
  public TestClient(INukeBuild nuke, Ping pingSender) : base(((ICanTestClient)nuke).TestExternalServiceUrl, pingSender)
  {
    //A place for logic to check or configure this particular client
    //Used when needed
  }
  //Place for client methods
}
At this stage, we have an abstract client and its implementation. However, both of these only loosely relate to Nuke: the only common point is getting the url through the INukeBuild interface.
Additional Information
In my examples, I pass the INukeBuild interface to the constructors of service classes in cases where it’s necessary to receive parameters. Only then will I make transformations to the interface necessary to obtain the parameter.
Another solution would be to receive, through the constructor, the interface necessary to receive the parameter. But then you would need to register in the DI container all the interfaces implemented by the nuke class.
There are other options, but in any case, the solution you choose is a matter of taste and habit.
Let's create an interface with a default implementation to describe the build step that the client created above will use:
public interface ICanTestClient: INukeBuild
{
  //Representation of the parameter to be passed as command line argument
  [Parameter] public string TestExternalServiceUrl => TryGetValue(() => TestExternalServiceUrl);

  //This is what executing a single build step in Nuke looks like:
  public Target DefaultTarget => _ => _.Executes<TargetAction>();

  //Class containing build step logic
  public class TargetAction : INukeTargetAction
  {
    private readonly TestClient _testClient;

    //Passing dependencies from DI container
    public TargetAction(TestClient testClient)
    {
      _testClient = testClient;
    }
    public void Invoke()
    {
      //The description of the build step in this case is very short
      Console.WriteLine("I do work");
    }
  }
}
Now we add this build step to the Nuke class (via interface implementation) and register the dependencies in the DI container.
public class Program: NukeBuildWithDependencyInjection, ICanTestClient //Adding an interface with a build step
{
  public static void Main() => Execute<Program>(x => ((ICanTestClient)x).DefaultTarget);

  protected override void AddOrOverrideDependencies(IServiceCollection services)
  {
    //Adding an interface with a build step
    base.AddOrOverrideDependencies(services);
    //Add dependencies for ICanTestClient
    services.AddSingleton<Ping>();
    services.AddSingleton<TestClient>();
    services.AddSingleton<ICanTestClient.TargetAction>();
  }
 }
}
Now, for testing purposes, we start the Nuke project with the command line arguments –DefaultTarget –TestExternalServiceUrl {required value} .
In the first case, let's try to start by passing a working and available host, for example, https://google.com:
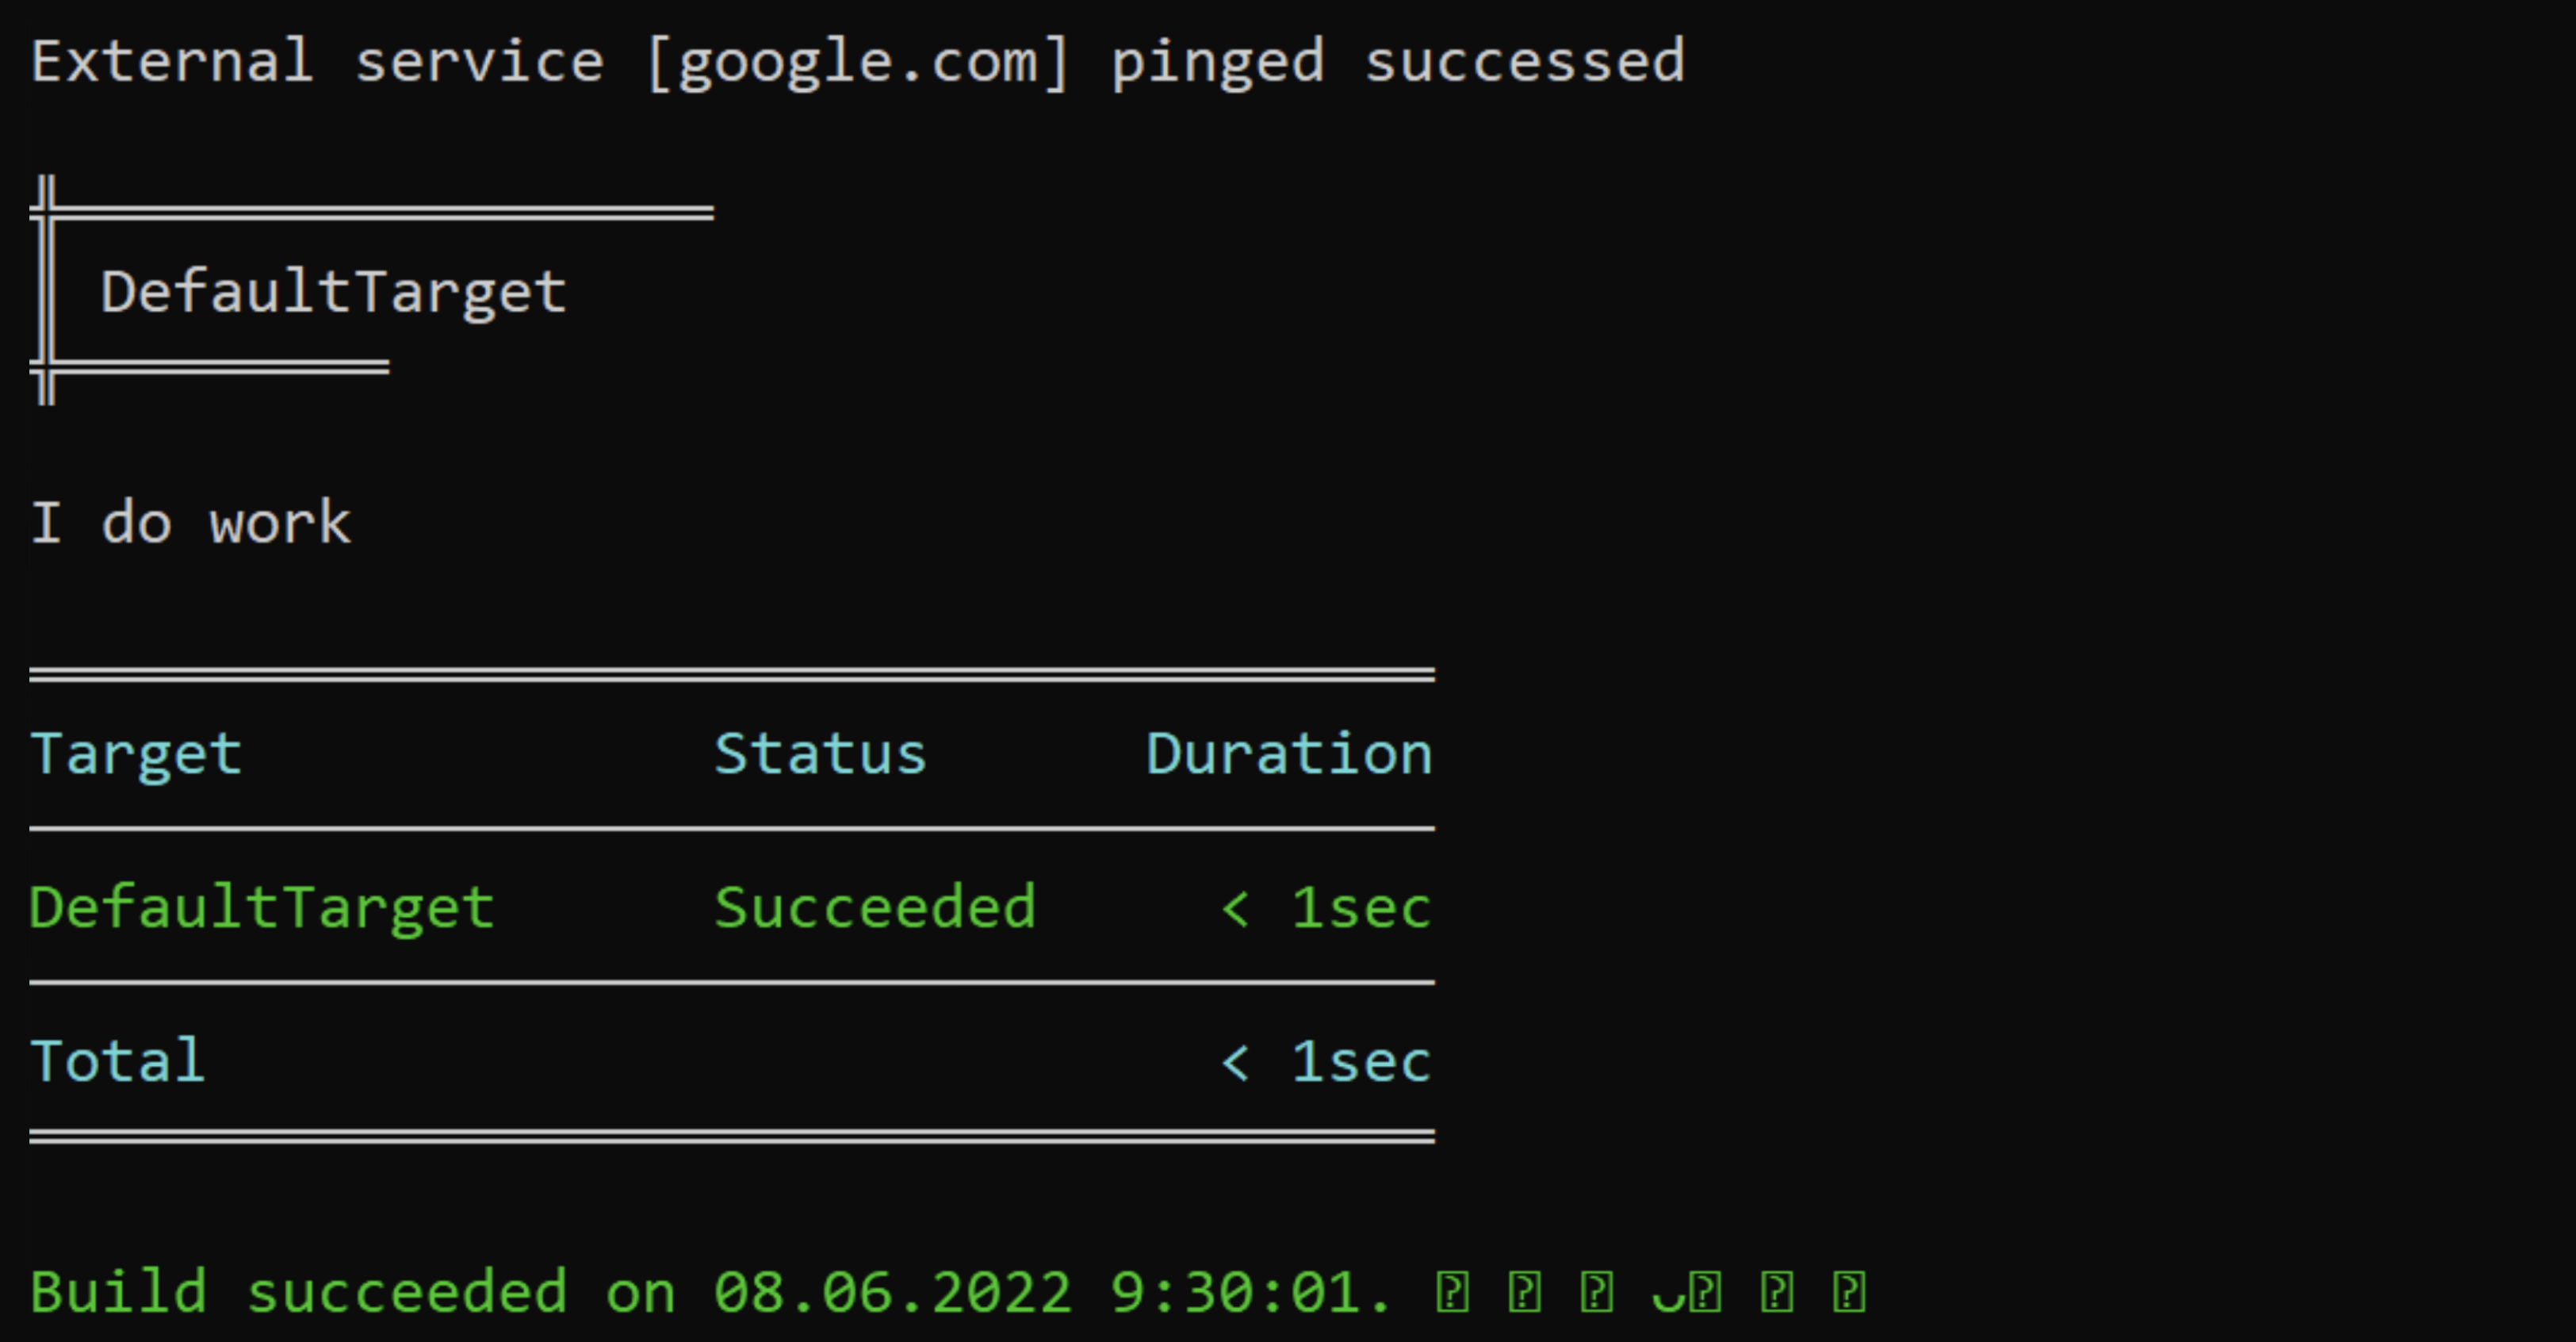
We see first that the availability of the google.com host is checked, then the DefaultTarget build step is successfully completed, and the build ends successfully.
Now let's try to pass a non-working host for TestExternalServiceUrl, for example https://aaaaaaakkkkkkk.com:

When trying to create a TestClient, an error occurs due to the unavailability of the host aaaaaaakkkkkkk.com. In this case, the build steps do not start (which means fail-fast worked successfully), and the build fails. We did not explicitly state anywhere that Nuke should check the TestClient - this happened automatically, since the code was designed within the framework of the previously proposed system.
Conclusion
Fail-fast is also good for everyday programming, as it helps generate adequate stack traces and find errors in the code faster. Nonetheless, in the case of CI/CD, it has a special feature – it performs efficiency and parameter checks before running the build/deploy steps.
Thus, Nuke allows you to conveniently check the parameters, the sequence of steps, and the availability of CLI tools. However, you will have to determine which build step depends on which parameter.
The ways to extend the Fail-fast approach described in the article are a kind of ‘Nuke upgrade’. The main purpose here was to isolate ways to allow service classes to be tested before the build steps begin. The resulting approach has additional advantages, for example, simplification of testing both individual targets and logic inside service classes.